Question: have you ever eaten coconut? No, no. The bagged junk
doesn't count. Who knows how long it's been there, or what kind of
adulteration it's endured. So much flavor and texture is lost. That's
why I prefer this recipe, which calls for the processing and use of your
own fresh coconut. It's a bit of a hassle, but once you get the hang of
it it's not hard at all, and believe me-
Believe me-
you'll be glad you did it.
I love making cakes in general, but coconut cake is among my favorites. It's a complicated procedure, sure, but to me that makes the successful final product that much more exciting. The recipe I use is directly from Good Eats, no alterations. We now refer to Alton Brown as "Uncle Alton" in my family due to how many of his recipes and methods we have adopted, and his coconut cake is the best I've had. The only amendment I made was that I used two coconuts, just to be sure I would have enough.
Coconut Cake with Fresh Coconut and Seven Minute Frosting
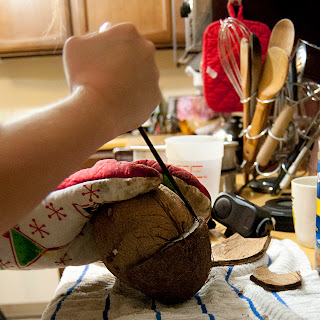
Now take a flathead screwdriver, or some other such prying device, and work it slowly under the main husk. I recommend covering your "strong" hand with something to protect it from both the residual heat of the coconut and from the inevitable flying screwdriver.
Try to keep the idiot from getting her hands on the halves
The next step, should you choose to perform it, is pretty time consuming. You could just buy the coconut milk, cream, and extract you're about to make at the store and be done with it, OR you could be a badass and make it yourself.
Trust me though, there is no shame in using store-bought.
Believe me-
you'll be glad you did it.
I love making cakes in general, but coconut cake is among my favorites. It's a complicated procedure, sure, but to me that makes the successful final product that much more exciting. The recipe I use is directly from Good Eats, no alterations. We now refer to Alton Brown as "Uncle Alton" in my family due to how many of his recipes and methods we have adopted, and his coconut cake is the best I've had. The only amendment I made was that I used two coconuts, just to be sure I would have enough.
Coconut Cake with Fresh Coconut and Seven Minute Frosting
(Easter-ized)
Ingredients (from Alton Brown's Coconut Cake Revival)
Ingredients:
Vegetable oil, for cake pan
14 1/4 ounces cake flour, plus extra for pans, approximately 3 cups
1 1/2 teaspoons baking powder
1 teaspoon kosher salt
1/2 cup fresh coconut milk
1/2 cup fresh coconut cream
8 ounces unsalted butter, room temperature
16 ounces sugar, approximately 2 1/4 cups
1 teaspoon coconut extract
4 egg whites
1/3 cup coconut water
Frost with Seven Minute Frosting
The
main thing that will keep you from imploding with frustration on this
project is doing things in the right order. First: prepare your
coconut(s).
Preheat oven to 375º.
Using
some kind of hole-making device (I prefer an electric drill, but a
hammer and nail will work as well) drill out the "eyes" of the coconut.
There is no way to keep that from sounding horrific.
Next, drain the coconut water.
Place coconut(s) in oven, and leave for approximately 20 minutes.
The object here is to crack the shell, so watch for good, long cracks. Not wee ones. We're talking plumber's bum here.
Now take a flathead screwdriver, or some other such prying device, and work it slowly under the main husk. I recommend covering your "strong" hand with something to protect it from both the residual heat of the coconut and from the inevitable flying screwdriver.
Once the husk is off, cut your coconut into more manageable pieces.
Using a vegetable peeler, clean the coconut meat. What shall we call this stuff? "Sub-husk?"
Rinse any remaining schmutz from coconut meat.
Finally, grate the coconut using the grater attachment of a food processor.
One coconut should be sufficient to decorate your cake, but if you're
planning to go on with the NEXT aspect of the project (making your own
coconut milk, cream, and extract) then you should definitely use two.
The next step, should you choose to perform it, is pretty time consuming. You could just buy the coconut milk, cream, and extract you're about to make at the store and be done with it, OR you could be a badass and make it yourself.
Trust me though, there is no shame in using store-bought.
In effort to save space here, I'm going to put the recipe for these three in a separate blog which you can access here.
Now, for the cake.
Now, for the cake.
Preheat the oven to 350ºF.
Grease, line, and grease again 2 9-inch or 3 8-inch cake pans. Flour pans.
For a handy guide to making perfectly fitted wax paper inserts for baking pans, click here
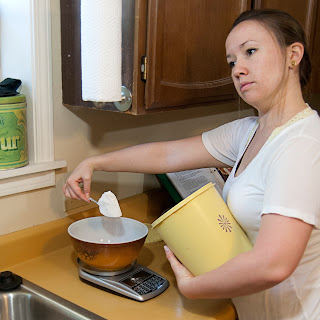
Mix yourself up some flour, baking powder, and salt.
In a separate bowl, mix together coconut milk and cream.
With
either a hand mixer or the paddle attachment of a stand mixer (I've
used both, go with the stand mixer if you have one) beat on medium until
butter is fluffy, roughly 1 minute.
Decrease speed to low and slowly add the 16 ounces sugar.
Once
all sugar has been added, scrape down sides and continue beating on
medium for 2-3 more minutes, until mixture lightens in texture and
increases in volume.
Stir in coconut extract.
With mixer on low, slowly mix in one third flour, one third milk, and repeat until all have been incorporated.
Do not over mix. Bitches.
In a separate bowl, whip egg whites until stiff peaks form.
Gently fold the peaked whites into batter.
Evenly distribute batter between cake pans, and bang on counter to evenly distribute batter/dislodge any air bubbles.
Bake
for 30-40 minutes, until cakes begin to pull away from sides and a
clean toothpick inserted into the middle of one of the rounds comes out
clean.
Allow
cake rounds to cool for 10 minutes in their respective pans, then turn
out onto cooling racks and allow to cool completely before frosting.
YOU have made cake.
Now don't you feel fancy?!
C'mon back in a day or two, and we'll continue this saga with some 7-minute frosting, also care of dear Uncle Alton. Thanks for stopping by!
All photos by Michelle Chasser/Brainchild Theories
C'mon back in a day or two, and we'll continue this saga with some 7-minute frosting, also care of dear Uncle Alton. Thanks for stopping by!
All photos by Michelle Chasser/Brainchild Theories


No comments:
Post a Comment